-
-
-
-
-
-
 e
e

Using Fill Flash
 Family Travel Photographs.com provides the following travel photography tutorial for photography and family traveler enthusiasts.
Be a Flasher!
Learn to use fill flash indoors and outdoors
For most people, the flash is something used only for indoor photos. As soon as people see sunlight, they shut off the flash and assume the image will have enough light without it.
A flash helps your photos by providing the correct amount of light, but it can also improve your shots by affecting the balance of light in specific areas of the image and the direction of light.
Look at the photo below, taken in the Doge’s Palace in Venice, Italy:
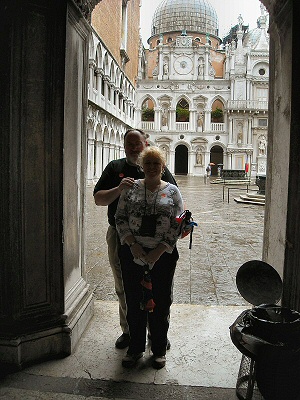
There was plenty of light to illuminate this image even though the skies were overcast. In spite of this, the people in the image are way too dark even though the background is properly exposed. So what happened?
The problem comes from the fact that the subjects were standing in a darkly shaded spot, with the open area behind us. If they had stood in the sunlight, they would have looked fine. If the sunlight wasn’t behind them in the photo, the camera would have adjusted for the shade and they would have looked fine as well.
However, the contrast between the shade and the sunlight was more than the camera could accommodate. The balance of bright and dark areas was more than the physical limits of the camera could capture. The camera had to make a decision on setting the exposure to respond to the needs of the sunlit area, or the shaded area. In this case, it exposed the sunlight properly and the shade ended up too dark. At other times, the camera will choose the other way and expose for the dark part of the image. Had this happened in the above shot, the subjects would have been properly exposed and the background would have been overexposed, looking washed out. Neither option is a good one.
This situation is a great opportunity to use a flash. The light from the flash will help to fill in the shady area and reduce the difference between shade and sunlight. This is why the use of a flash in this situation is called a “fill flash.” Let’s look at the same photo again, this time with the flash engaged.

Looks much better, doesn’t it? You can see plenty of light from the front, even a reflection from the flash in the glasses. Now the contrast between shaded area and sunlight is reduced because of the additional light coming from the flash. The camera can handle this amount of contrast, and as a result the picture is exposed for both parts of the photo.
Subjects positioned in front of windows are probably the most common situations where backlighting causes a problem. Here's a shot of Q in front of a window on our cruise.
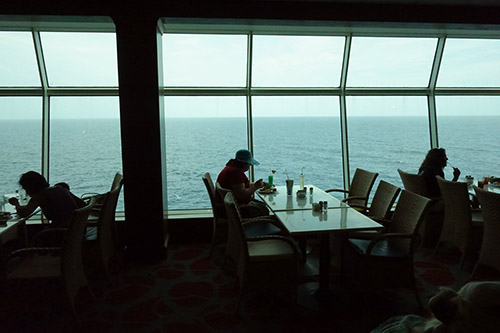
Almost everyone has taken a photo that looks like this. The sunlight outside the window throws off the exposure, making everything inside the room extremely dark. Add a flash to your shot and it looks like this:

Quite the difference, isn't it? You subjects inside the room are well exposed but you don't lose the outside scenery in the process.
One more example and it's a dramatic one:
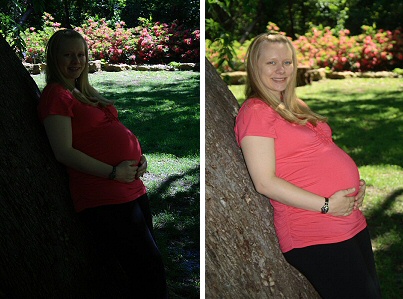
Without the flash, the subject's features are all but lost and the colors are somewhat subdued because she is in the shadows. Look at the picture to the right - she is properly exposed and the colors are warmer and more vibrant.
So that’s the first way a flash can be used, to change the balance of light throughout your image. Now let’s talk about the direction of light.
To do this, let’s talk for a moment about shadows. Have you ever noticed that on bright, sunny days that shadows are very dark and clear, with nice sharp edges? Contrast that to cloudy days – when the sky is overcast, shadows are much more subdued, softer and less defined. The reason is referred to as the size of your light source.
On a sunny day, the light comes from . . . well, the sun. (I have such a keen sense of the obvious, don’t I?) We all know the sun is huge, but from here on earth the sun looks tiny, like a little round spot in the sky. It is, in effect, a small light source (also called a direct light source). With all the light coming from that one small source, it acts like a flashlight – the rays of light hit the subject in a very strong, directional way. As a result, the opposite side of the subject is in the shade; it gets a lot less light and is much darker than the illuminated side.
Cloudy days are different. The light still comes from the sun and the sun doesn’t change size, but now you have a layer of clouds between the sun and the subject. The light passes through the clouds and gets spread out. Instead of the light coming from a small sun, it is “diffused” and spread out through clouds that cover the entire sky. The clouds become the light source and compared to the size of the sun, they’re huge. Now the light source is much, much bigger – and is referred to as a large light source. The light essentially comes from all over the place and as a result is more indirect. Now you have lighter, softer shadows on your subject because the light is coming from a lot of different directions.
Portrait photographers recognize this in their studios. Have you seen those big white soft boxes or umbrellas they use on their flash units? They’re increasing the size of the light source. Instead of all the light coming from a couple tiny flash bulbs, they’re running the light through that big white screen or bouncing it off the comparatively large umbrella. This increases the size of the light source and reduces and softens the resulting shadows on the subject.
Let’s bring this back to the conversation about using the flash. On cloudy days the natural lighting will provide flattering, soft shadows on your subjects. On sunny days, however, you can expect clearly defined, very directional shadows. You will see a large contrast between illuminated parts of your scene and those parts in shadow . . . and the fill flash will be your friend, reducing that contrast so your complete image is properly exposed.
Here is a picture of two people at Fort Worth’s Botanical Gardens:
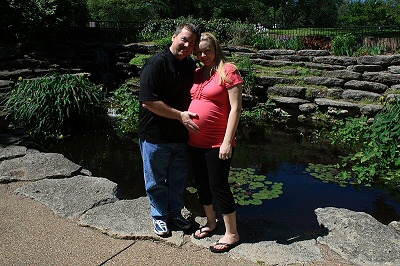
Notice the harsh shadow across their faces? The bright sunlight is clearly coming from (their) right, causing dark shadows on the left sides of their faces.

Same basic shot, with a flash. The shadows are still there but they’re much softer now. You can actually make out their features, even in the shadows.
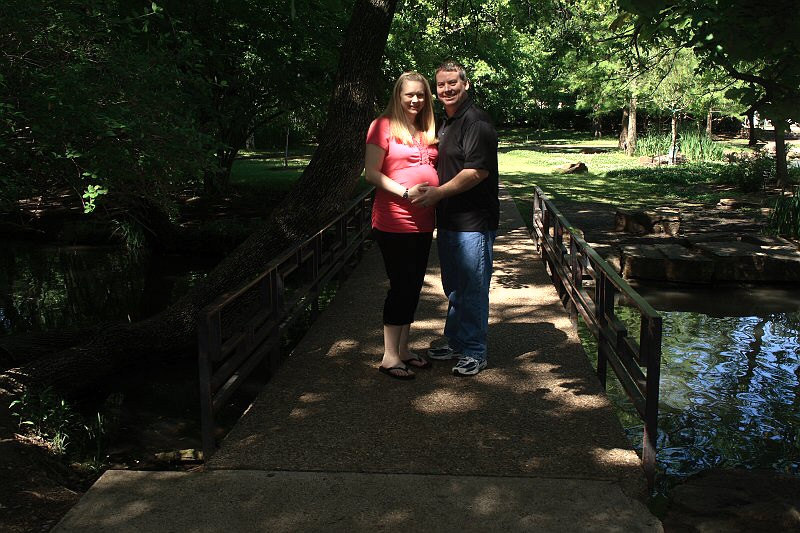
Another example – notice the dark shadows on their faces. Also notice how the sunlight blows out the color on the female’s blouse in spots where the sunlight comes through the overhead trees. Contrast makes this a tough shot.

Here it is with the flash. The shadows are softened, as is the spots on her blouse that were previously overexposed.
Always check your shots when using the fill flash. At times your camera will be fooled and will not adjust the exposure for the flash light – meaning the resulting image is overexposed. The camera is supposed to adjust the flash and the exposure, but sometimes it doesn’t work out. Try out using the fill flash and get comfortable with it before you start shooting our vacation photos.
So how do you tell your camera to use the flash? That depends on the camera. For my DSLR, simply opening the flash tells it to fire. On most point and shoot cameras, there is a flash button, where you can tell it to 1) always flash, 2) never flash, or 3) let the camera make the decision as to whether flash is needed. The third option is the default in most cases but you can force the flash by toggling this button. You need to know where this button is anyway – if you go into a museum that doesn’t allow flash photography, this button allows you to shut off the flash and stay out of trouble! Read your manual for more information.
One more thing about fill flash. If you find the camera is blowing out (over exposing) the photos when you use fill flash, look to see if the camera allows you to adjust your flash OR if you can adjust the exposure compensation. With exposure compensation you can tell the camera to underexpose the image – so when the camera thinks it’s supposed to over expose, your instruction to underexpose counteracts that and you end up with a good shot. Read more online about exposure compensation to see how this works.
Please help me get more visitors to Family Travel Photos.com!