Taking the Wide View: Panoramas
 Family Travel Photographs.com provides the following travel photography tutorial for photography and family traveler enthusiasts.
STEP 4: STITCH YOUR PICTURES TOGETHER WITH ICE
Use Microsoft ICE to stitch your photos together into a perfect panorama
Microsoft ICE (ICE stands for Image Composite Editor) is a program that does one thing - it makes panoramas. And it’s free!
Click here to go to the web page for Microsoft ICE.
Download and install ICE to your computer.
Next, copy your panorama pictures to their own folder on your computer’s hard drive. Don’t try to make panoramas with pictures that are stored on thumb drives or external drives – ICE will just lock up on you because those devices aren’t fast enough.
Don't have any panorama pictures yet? No problem. I have provided a set of panorama pictures for you to try out. Click here to download them in a single zip file. Extract the pictures in this zip file to your C drive – again, don’t put them on to an external drive because ICE will lock up when you try to access them.
Open ICE.
Now that you’ve got the demo pictures, it’s time to start. You need to bring all the pictures in your panorama into ICE. You can do it by choosing File | New Panorama. I prefer selecting the files in Windows Explorer and dragging them into ICE.
Either way, you have to select ALL the pictures for your panorama and bring them in. In Windows, you click on the first file, hold your SHIFT key and click on the last and that will select all the files between.
Go ahead and bring in my example pictures that you downloaded in the zip file.
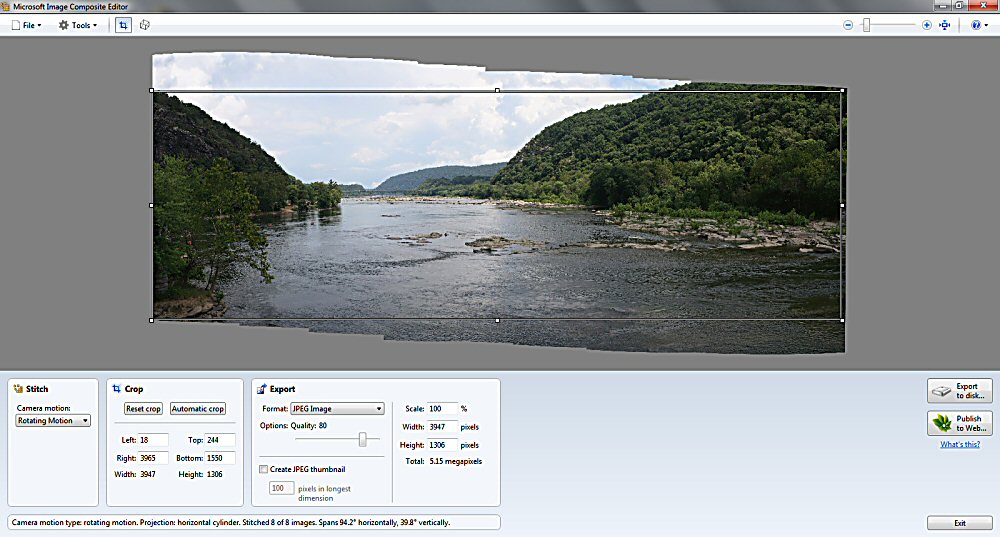
The photos will be brought in and merged automatically by ICE. You will see the program processing and compositing the files. When it’s finished, you’ll see your panorama in the program – using my sample files, it should look something like this.

Click the above screen capture for a larger version of the image.
So what do you see? Well, obviously, the four edges of the image are ragged - especially the top and bottom. Surrounding the panorama is a black selection box with white boxes at the corners and in the middle of each side.
The panorama edges are ragged because the program is merging two-dimensional images of a three-dimensional scene, so the lines aren’t straight. Further, even the surest hand won’t rotate perfectly through a series of pictures, so the images won’t line up along the edges completely.
Not a problem – ICE lets you address that.
The black selection box around the panorama allows you to select what part of the image will be cropped out when you save the file. You can click on any of the little white boxes and drag the sides in. The idea is, you can move a line in far enough so that you crop out all of the ragged edges and include only that part of the image that is complete all across the image.
Give it a try. Click and drag the top line down until all of the ragged edge is above the line. Now do the same with the sides and bottom. When finished, the image should look like this.
Click the above screen capture for a larger version of the image.
When you save your panorama, anything outside the selection box will be cropped out.
A couple thoughts about cropping your panorama.
First, the more photos that comprise the panorama, the greater the ratio of width to height. Ultimately, as you made your panorama wider and wider, it becomes more and more of a photo strip. As you look at your composited panorama, pay attention to the image at both sides. You may find that your photo isn’t improved by the content at the left and right sides. You can pull in the selection box closer to the center to crop out parts of the image you don’t want – and your width-to-height ratio won’t be as dramatic.
Second, if you have an end use in mind for your panorama, you may want to factor that in to your cropping. For example, if you know you want to print this to display in a 10” x 20” frame, you know your image will have a 1:2 aspect ratio. (Don't know what "aspect ratio" means? Click here.) ICE tells you what the dimensions of your selection are (across the bottom of the screen, under Crop), so you can enter pixel amounts for the crop selection box until it fits the aspect ratio you need. Then you can grab the selection box and move it around your image so that the shape you need with the correction dimensions includes the most important part of the image.
So that’s cropping. You have some other editing options. You can change the stitching based on how the camera was rotated with the pulldown box for camera motion. I find the automatic setting normally does the best job but you can test each one to see which you like. You can choose settings to scale the panorama at different sizes, or save the panorama file formats.
Once you have the settings as you want, hit the button to Export to Disk and save the file to your computer.
There are other settings you can play with, but that essentially is the process. Pretty simple – bring in the photos, crop the image to your preference and save the panorama.
Previous step: Transfer the pictures to your computer — Next step: What to do with your panoramas
Here are steps to creating panoramas:
Please help me get more visitors to Family Travel Photos.com!